1.What are the products included in VMware vSphere 5.5 Bundle ?
- VMware ESXi
- VMware vCenter Server
- VMware vSphere Client and Web Client
- vSphere Update Manager
- VMware vCenter Orchestrator
2.What type of Hyper-visor VMware ESXi is ?
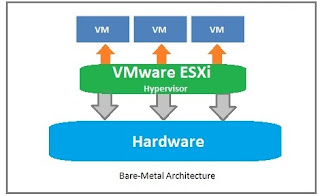
- VMware ESXi is Bare-metal hypervisor. You can directly install on server hardware.
3.What is the role of VMware vCenter server?
- vCenter provides a centralized management platform and framework for all ESXi hosts and their respective VMs. vCenter server allows IT administrators to deploy, manage, monitor, automate, and secure a virtual infrastructure in a centralized fashion. To help provide scalability , vCenter Server leverages a back-end database (Microsoft SQL Server and Oracle are both supported, among others) that stores all the data about the hosts and VMs.
4. Is it possible install vCenter server on Linux hosts ?
- No.But Pre-build vCenter appliance is available in VMware portal which is Linux based.You can import the appliance as virtual machine.
5.How to update the VMware ESXi hosts with latest patches ?
- We can update the ESXi hosts using VMware Update Manager(VUM). We can use this VUM add-on package on Windwos based vCenter server and Linux based vCenter server (vCenter appliance)
6.What is the use of VMware vSphere Client and vSphere Web Client ?
- vCenter Server provides a centralized management framework to VMware ESXi hosts.To access vCenter server, you need vSphere client or vSphere Web client service enabled.
7.What is the difference between vSphere Client and vSphere web client ?
- vSphere Client is traditional utility which provides user interface to vCenter server. But from VMware vSphere 5 onwards,vSphere web client is a primary interface to manage vCenter server.For vSphere client, you need install small utility .But vSphere Web client doen’t require any software. You can directly connect using web browser.But still VUM is managed through vSphere Client .
vSphere Client:
vSphere web-client:
8.What is the use of VMware vCenter Orchestrator ?
- vCneter Orchestrator is used for automation on various vSphere products.
9.What are the features included in VMware vSphere 5.5 ?
- vSphere High Availabitliy (HA)
- vSphere Fault Tolerance
- vSphere vMotion
- vSphere Storage vMotion
- vSphere Distributed Resource Scheduler (DRS)
- virtual SAN (VSAN)
- Flash Read Cache
- Storage I/O Control
- Network I/O Control
- vSphere Replication
10.What is the use of vSphere High Availability(HA)? Where it can be applied ?
- VMware vSphere HA minimize the VM’s unplanned downtime by restarting the VM guests on next available server ESXi node inacase of failure on current ESXI node. VMware HA must be enabled to reduce the VM unplanned downtime.


